Dear Zendure Users,
Since the release of APP V6.3.0 and the June device firmware update, Zendure has been closely monitoring your feedback and suggestions. We understand that this update has caused inconvenience and disruption to some users' daily energy management, and we sincerely apologize for this.
To help everyone quickly identify issues and find solutions, we have compiled this FAQ and troubleshooting guide. The announcement is divided into two main sections: [Operational Troubleshooting] (diagnosing device anomalies) and [Feature Updates & Guidelines] (navigating new features and logic changes), with step-by-step solutions provided for each sub-category. Detailed instructional documentation will be supplemented later.
⭐This announcement will be continuously updated, please stay tuned to this thread. Thank you to all users for your valuable feedback and corrections!
I.Operational Troubleshooting (Device Anomalies)
This category mainly involves operational faults such as device standby, firmware upgrade failures, and abnormal power output. Users can self-check and troubleshoot according to the following sub-categories.
1.1 Unexpected Device Standby
The device entering standby mode is the most concentrated issue in this feedback, but the causes of standby vary. Please handle it according to your actual situation based on the following scenarios:
**Scenario A: Incorrect LAN port connection triggering standby**
—— The RS485 port (RJ45 shape) was mistakenly connected with an Ethernet/LAN cable. This triggers the system's built-in grid safety protection mechanism, forcing the system into a safety standby mode.
Applicable Models: SolarFlow 2400 Pro / 2400 AC+
Solution:
① Immediately remove all Ethernet/LAN cables from the RS485 port (this port is only used for connecting Zendure Smart Meter 3CT-S and Smart Meter 1CT-S);
② Fully power off the device, wait for 30 seconds, and then turn it back on;
③ After rebooting, the system will automatically exit standby mode, and PV charging and AC discharging functions will resume normally. Subsequent firmware updates will optimize this logic to only take effect in the Austrian region.
**Scenario B: Unconfigured time slots in Custom Mode**
—— In HEMS 2.0 Custom Mode, the "Output Power for Unset Periods" defaults to 0W. If the user does not manually configure it, the device will enter standby during uncovered time periods.
Applicable Models: All series
Solution:
① Open the Zendure App → enter HEMS → Settings → Energy Plan → select "Custom Mode";
② At the bottom of the mode configuration page, find the "Output Power for Unset Periods" option;
③ Adjust the value from 0W to your required power (e.g., 200W, consistent with the old version's base load); ④ Save the settings, and the system will take effect shortly.
**Scenario C: Device reaching TOU mode medium price discharge SOC lower limit, or system protection lower limit**
—— Four normal standby scenarios: reaching the TOU mode discharge SOC lower limit, battery over-discharge reaching the system protection lower limit, standby periods calculated by the ZENKI algorithm, and unconfigured periods in Custom Mode.
Applicable Models: All series
Solution: The device will enter standby when it reaches the SOC lower limit in HEMS in the following situations:
- Reaching the TOU medium price discharge SOC lower limit
- Battery over-discharge reaching the system SOC lower limit
- Standby periods calculated by the ZENKI algorithm
- Custom Mode unset periods default outputting 0W
First, determine which of the above scenarios applies to you;
① If it belongs to Scenario 1: Check the "Stop Discharging SOC" setting in TOU mode. If the current SOC has reached this value, it is normal. It will automatically resume charging during the next low-price period, or discharging during the next high-price period;
②If it belongs to Scenario 2: Connect AC power to charge the device, and it will automatically exit standby once the battery level rises;
③If it belongs to Scenario 3 or 4: This is normal scheduling behavior and requires no operation; the system will automatically wake up at the next set period.
**Scenario D: Hardware fault codes (223 / 224 / Internal DC&AC circuit hardware related fault codes)**
—— The App displays fault code 223 (BMS short circuit protection) or 224 (BMS overload protection), requiring contacting after-sales for hardware troubleshooting and replacement.
Applicable Models: All series
Solution:
① Take a photo or screenshot to keep a record of the fault code display;
② Do not repeatedly restart to attempt recovery (may cause secondary damage);
③ Send an email to support@zendure.com, with the subject including [HEMS2.0];
④ Attach the device SN, fault code screenshot, and the time the issue occurred in the email;
⑤ The after-sales team will perform remote diagnostics and arrange the hardware testing/replacement process.
Scenario E: Standby Caused by Abnormal 0W Power Command from HEMS (Patch Released)
—— The device remains continuously in standby mode and cannot charge (surplus energy recovery) or discharge to the grid as expected by the user. Because the power command issued by HEMS is abnormal and constantly stays at 0W, the device strictly follows the HEMS command, remaining in standby without performing any charging or discharging actions.
Applicable models: All series
Solution: A patch has been released to resolve this issue.
Scenario F: CT Detects Surplus PV but Device Does Not Respond to Charge Command (Patch Released)
—— The CT has detected reverse surplus energy from a third-party PV feeding into the grid (i.e., there is recoverable surplus power), but the storage device remains stuck in standby mode. It does not perform charging actions and cannot recover the surplus PV energy. The root cause is that the HEMS fails to properly issue a charging command to the device after receiving the CT surplus signal.
Applicable models: SolarFlow 800 Series; SolarFlow 2400 Series
Solution: A patch has been released to resolve this issue.
1.2 Firmware Upgrade Issues
After this APP update, devices must synchronously upgrade the firmware to the latest version to run HEMS 2.0 normally. If you experience freezing during the upgrade process, please check against the following two situations:
Scenario A: Battery below 10%, unable to upgrade
—— The device power is insufficient, failing to meet the safety conditions for a firmware upgrade, and the current HEMS mode does not trigger charging. You need to remove the device from HEMS, manually charge it, and then rejoin.
Solution:
① Open the App → enter the device control page → turn off the HEMS switch (temporarily disable);
② Enter "Single Device Settings" → "Grid-tied Settings" → "AC Input Mode";
③ Manually set the AC charging power (e.g., 800W), and the device will immediately start drawing power from the grid;
④ Wait for the battery level to charge above 20%;
⑤ Return to HEMS to proceed with the firmware upgrade; ⑥ After patiently completing the upgrade, turn the HEMS switch back on.
Scenario B: Upgrade progress stuck at 33% or 60%
—— Usually caused by a weak network environment or high server pressure during peak upgrade hours.
Solution:
① This phenomenon is usually caused by weak Wi-Fi signals or server congestion during peak upgrade times; ② Check the Bluetooth/Wi-Fi connection status of the phone and device to ensure a good signal;
③ Exit the upgrade page, return to the App homepage, and re-enter the firmware upgrade interface;
④ Click "Start Upgrade", usually one retry will succeed;
⑤ If multiple retries still fail, please try changing the network environment (e.g., switch to a 5G hotspot, reset the energy storage device network connection, reconfigure the network, connect to a different network) and try again.
1.3 Power and Performance Anomalies
Scenario A: Zero export setting not taking effectApplicable
Models: Hyper 2000 / SF 800
Solution: A patch has been launched to fix this. Please upgrade to the latest firmware and verify. If the problem persists, please contact after-sales according to the guidelines.
Scenario B: Output derating due to increased ambient temperature
—— When the ambient temperature is high (e.g., above 32°C), the device actively reduces power output to protect internal power semiconductors, which belongs to a normal thermal protection mechanism. It is recommended to place the device in a cool, ventilated place or install an external fan to assist cooling.
Solution:
① Check the device placement to ensure it is away from heat sources and avoids direct sunlight;
② Ensure there is a ventilation gap of ≥15cm around the device, especially in the rear heat dissipation area; ③ It is recommended to install an external fan (120mm or 200mm) at the rear or side (depending on the product model) of the device to strengthen active exhaust; ④ After the temperature drops, the DSP will automatically lift the derating, and the output power will gradually recover without manual intervention.
Scenario C: Third-party PV detection not taking effect (Patch released)
—— The system failed to correctly detect third-party photovoltaic power generation data. It is necessary to confirm the CT installation location, direction, and the working status of the third-party inverter.
Solution:
① Confirm that the CT sensor is installed on the grid incoming cable (not the inverter output end);
② Check if the directional arrow on the CT points to the grid side (incorrect installation direction will cause abnormal readings);
③ Confirm that the CT clamp is completely closed and locked (looseness will cause intermittent readings);
④ Confirm that the third-party inverter itself is in a normal power generation state (check its own monitoring App to confirm);
⑤ After completing the above checks, if it is still invalid, please contact after-sales and provide the inverter brand, model, and logs.
Scenario D: SOC shows 100% when the battery is not fully charged
—— Caused by LFP battery BMS calibration drift, it can be restored through 2-3 complete "full discharge → full charge" cycles.
Applicable Models: All series (LFP batteries)
Solution:
① Perform a complete "charge and discharge calibration": discharge the battery until the system automatically shuts down (0% protection triggered);
② Let it stand for 10 minutes to allow the cell voltage to stabilize;
③ Fully charge the battery to 100% at once and maintain the charging state for 15 minutes (cell balancing); ④ The above "full discharge → full charge" is 1 complete cycle. It is recommended to execute it 2-3 times consecutively;
⑤ After completing 2-3 cycles, the BMS will complete the calibration, and the capacity display will return to normal.
Scenario E: MQTT Communication Failure Prevents Power Adjustment Commands from Being Issued (Patch Released)
—— After a software upgrade, the MQTT connection between the App and the device fails to establish, resulting in the device being unable to receive power adjustment parameters issued from the cloud. Specific symptoms are:
① The input/output power is locked at a certain fixed value (e.g., 1000W) and cannot reach the original power level prior to the upgrade (e.g., 1500W);
② The output power of a multi-HUB cluster is significantly lower than before the upgrade;
③ Users cannot adjust the output/input power of the HUB via the App;
④ Single-device settings do not take effect.
Applicable models: HUB1200 / HUB2000 only
Solution: A patch has been released to resolve this issue.
1.4 Power and Performance Anomalies (Many-to-One Local Communication Scenario)
During recent investigations into scenarios where multiple Zendure devices are paired with 1 CT within the HEMS, we have identified several power and performance issues caused by firmware logic defects. Currently, the patched versions are undergoing urgent testing and will be pushed via OTA subsequently. In the meantime, please prioritize using the "Temporary Workarounds" to avoid these issues.
Issue 1: Abnormal SOC Limit reporting of SolarFlow 800 Pro / SolarFlow 800 Pro 2, leading to unbalanced reverse feed allocation
—— When a SolarFlow 800 Pro or SolarFlow 800 Pro 2 is present in the HEMS, and its battery is fully charged and in the PV bypass reverse feed state, the HEMS fails to properly reduce the discharge power of other non-bypass energy storage devices. This causes the total output power to exceed the home load, resulting in an overall reverse feed to the grid.
Applicable models: SolarFlow 800 Pro / SolarFlow 800 Pro 2
Temporary Workaround: Before the firmware update is released, please temporarily remove the aforementioned devices from the HEMS cluster (or pause their participation in discharge scheduling) to prevent uncontrolled reverse feeding. If removal is not possible, please temporarily turn off the PV input of the device, or lower the target charging SOC to 90%.
Issue 2: Calculation anomaly during the 0-timezone cross-day period, resulting in no charging during low electricity price periods
—— When the HEMS is in local communication control mode, if the low electricity price period occurs between 0:00 and 2:00 European time (cross-day threshold), the system cannot correctly identify the time zone calculation logic, causing the device to not execute charging commands during this period. Based on observation, this time slot rarely appears in European electricity pricing, so the trigger probability is low.
Applicable models: All series (HEMS local communication control scenario)
Temporary Workaround: Please go to the Zendure App → HEMS (Home) → Settings → Lab Feature -> One-to-Many Local Communication, and temporarily turn this switch off. After turning it off, the system will bypass this time zone calculation anomaly.
Issue 3: Erroneous surplus judgment triggered after CT detects negative power
—— When multiple energy storage devices in the HEMS are under local communication control, if the CT (Current Transformer) detects momentary negative power during the adjustment process (e.g., reverse current on the grid side), the HEMS incorrectly judges that the system has entered a "surplus" state (assuming excess PV). This causes the control logic to interrupt for a few seconds before resuming, and this state cycles repeatedly, causing power output oscillation.
Applicable models: All series (Multiple devices local control scenario)
Temporary Workaround: Please go to the Zendure App → HEMS (Home) → Settings → Lab Feature -> One-to-Many Local Communication, and temporarily turn this switch off. Once turned off, the system will no longer trigger false surplus judgments due to negative CT values, and power control will stabilize.
Issue 4: When reverse feeding is disabled, bypass devices receive a 0W power command, causing repeated start-stops
—— When multiple energy storage devices in the HEMS are under local communication control and the "Disable Reverse Feed" function is turned on, if an energy storage device is fully charged and in bypass mode, the HEMS will issue a 0W discharge power command to this bypass device, causing it to briefly shut down. A few seconds later, the HEMS reallocates power to resume its operation, repeatedly entering a "shutdown → resume → shutdown" cycle.
Applicable models: All series (Multiple devices local control + Disable reverse feed scenario)
Temporary Workaround: Please go to the Zendure App → HEMS (Home) → Settings → Lab Feature -> One-to-Many Local Communication, and temporarily turn this switch off. After turning it off, the HEMS will no longer issue 0W commands to bypass devices, effectively mitigating the cyclic start-stop issue.
II.Feature Updates & Guidelines (Logic Changes & New Features)
This category mainly involves changes in functional logic, adjustments to the UI interface, and the planning of new features after the HEMS 2.0 update. Most of these changes are intentional design evolutions rather than system defects. Users are requested to carefully read the following instructions to fully understand the design philosophy of the new system.
2.1 Mode Logic and Setting Changes
① The "Base Load" concept has been removed
—— In HEMS 2.0, "Base Load" has been canceled. The three user scenarios that originally relied on base load (Smart Plug only, Auto Mode + Smart Plug, Auto Mode without CT or plug) can now be configured via Custom Mode → Preferences → Output Power for Unset Periods. The current UI position for this setting is not prominent enough, and we have scheduled an optimization.
Operating Guidelines: Enter Custom Mode → Preferences page → "Output Power for Unset Periods" at the bottom → adjust to the required wattage.
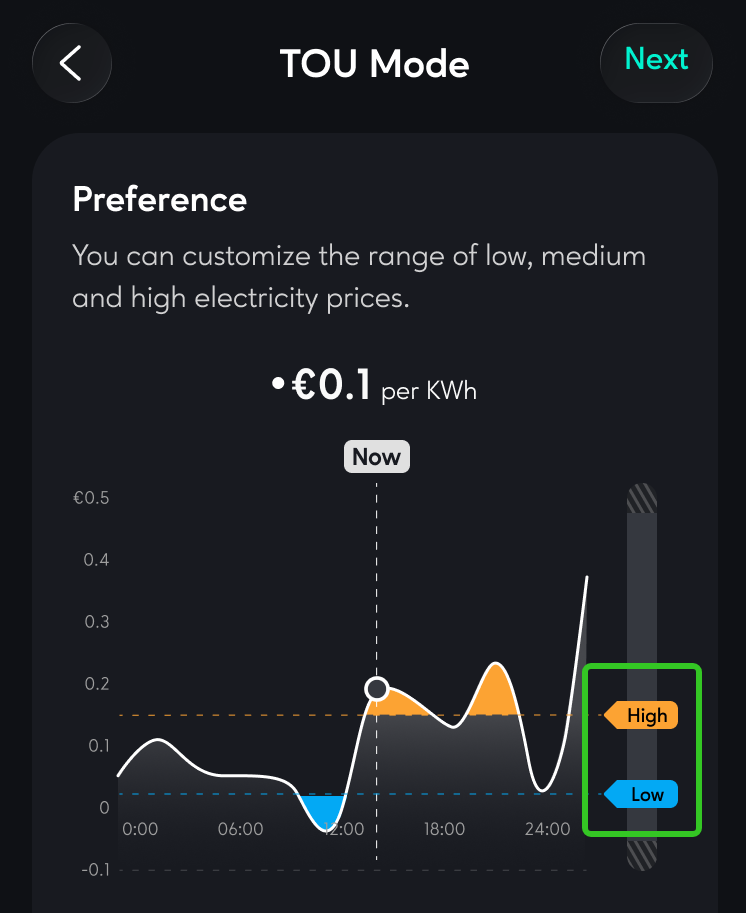
② TOU Mode High/Medium/Low price ranges are customizable
—— This function has always existed, but the entry point is not prominent enough, leading users to mistakenly believe it is unsupported. Users can find the slider in the secondary setting area ("Price Settings" or "Rate Configuration") on the TOU configuration page and customize the range by percentage.
Operating Guidelines: Enter TOU Mode settings → find "Price Settings" / "Rate Configuration" → drag the slider to adjust the high/medium/low thresholds.
③ Logic differences between the new "Self-Consumption" mode and the old "Smart CT" mode
—— The new Self-Consumption mode is fully automatic optimization (prioritizing self-use, minimizing grid power draw, zero export), and no longer provides a manual AC charging switch. This is an industry standard design (same as Tesla, Sonnen, etc.) and will not be rolled back. Users who need to manually control AC charging, please switch to Custom Mode.
Operating Guidelines: Automation needs → use Self-Consumption Mode; Manual control needs → use Custom Mode.
④ TOU Mode now forcibly requires a CT (not mandatory in the old version)
—— The new TOU mode is centered on "load following + zero export", making CT a mandatory configuration. Users without a CT who wish to purely perform "charge low, discharge high" arbitrage can manually set the charging and discharging periods via Custom Mode to achieve this.
Operating Guidelines: Use Custom Mode to manually configure the charging and discharging schedule.
2.2 Planned Feature Optimizations (Coming Soon)
The following features have been included in the recent optimization list, and we will launch them successively through subsequent OTA and App updates:
① Auto Mode charges to 100% during low prices (No reserved capacity for PV)
—— The original logic was designed to dynamically adjust charging targets based on the next day's PV forecast. Due to scheduling, this was temporarily simplified to "fully charge during low-price periods." A future update will restore the smart PV forecast logic, preventing solar waste during the day when the battery is already full. Please stay tuned for official updates.
Workaround: Go to Home -> Settings -> Battery Settings and manually lower the "Max SOC" from 100% to e.g., 50% (as needed). This reserves physical capacity for tomorrow's PV generation. You can raise it back to 100% in the morning.
② Device list tab doesn't support swiping & lacks charge/discharge status
—— This UI flaw has been noted. Confirmed optimizations include: 1. Allowing card swiping within groups; 2. Adding charge/discharge/standby status icons; 3. Removing the battery pack count to reduce visual clutter. These changes will take effect automatically post-update.
Workaround: To view the full status of a device, please tap the device card to enter the details page, where charge/discharge status and power data are fully displayed.
2.3 Four Quick Clarifications
The following are four cognitive deviations widely reported by users during this update. We are clarifying them here centrally—these are all intentional design changes, not system faults:
Q: Why is it mandatory to upgrade the firmware?
A: HEMS 2.0 introduces a new operating logic. If only the app is updated without updating the device firmware, the device will continue running the previous HEMS logic. As a result, new settings may not take effect or certain features may not function as expected.
The new HEMS 2.0 logic will only take effect after the firmware has been updated. Once updated, your settings will be applied correctly.
Before updating, please ensure that the battery level is at least 20% and that the network connection is stable.
Q: Where did the "Smart Plug Mode" go after the update?
A: The logic of the previous "Expert - Smart Plug Mode" has been integrated into "Auto" mode.
Q: Why can't I set the high, medium, and low electricity price thresholds after the update?
A: The function has not been removed; the entry point is just less obvious. Please find the high and low price range setting slider in the TOU setting page.
Q: Did the configuration items disappear after the Smart CT mode update?
A: The previous "Expert - Smart CT Mode" has been simplified and restructured.
① The former "Preference: Charge with surplus energy" option is now built into the "Zenki", "Auto", "Self Use", and "TOU" modes whenever a Smart CT is connected. No additional configuration is required.
② The former "Preference: Charge based on electricity price" option is now built into the "Zenki", "Auto", and "TOU" modes by default.
③ The former "Preference: Charge by schedule" option has been removed in HEMS 2.0. Users with a Smart CT can use "Zenki" or "TOU" mode instead to charge based on electricity prices. Users without a Smart CT can use "Custom" mode.
④ The "Start AC Charging" switch has been removed.
III. Conclusion
We deeply understand that every system update is a dialogue with user trust. The HEMS 2.0 upgrade carries our vision for smarter and safer energy management, but it has also caused you trouble due to some ill-considered design decisions and UI layout. We are making every effort to respond to each user's concerns one by one through announcement guidelines, UI optimization, firmware patches, and new feature iterations.
Thank you for your tolerance and support for Zendure. May your every day be full of sunshine!
Your Zendure Team